Running a server/Installing custom maps

Your players will inevitably get bored with the official set of maps provided. You will almost certainly want to install some of the many additional maps around to improve the experience of your game server.
Installing custom maps is a simple process providing map artists follow the map distribution guidelines. You will have downloaded a map as a file containing the map contents typically as a ZIP, RAR, or 7Z archive. Maps are rarely distribute maps as a standalone BSP file or as a bunch of unpacked files.
You can use a free utility such as 7-Zip to open most of the archive formats around today. This runs on both Windows and Linux and is provided for free of charge.
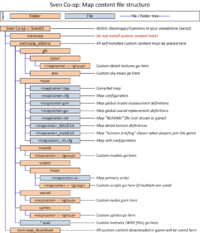
When you open the archive you should see a set of folders that could be gfx, maps, models, scripts, sound, and sprites. It's also likely you'll see a bunch of WAD files here too. If this is what you see you will need to extract all of these to your server's svencoop_addon folder.
- Do not extract any unofficial resources directly into the svencoop folder. To help keep your game files clean, use the svencoop_addon folder. The game engine is perfectly capable of loading maps and their contents from this location.
- If there is a scripts folder included take a look inside before extraction. There should only ever be a maps folder inside this. Anything else should be treated as suspicious and not extracted, or deleted after extraction.
- If there is only a svencoop folder inside the archive, you need to enter this folder before extraction. This shows the map artist has not followed our current guidelines on map distribution.
- If there is only a BSP file (and maybe a couple of TXT/CFG files along side it) this means the map doesn't have much custom content. These files should be extracted to the maps folder within the svencoop_addon folder.